Jekyll - Continuous Deployment With Github, CircleCI, Kubernetes, and Google Cloud Platform - Part 1

What’s Jekyll?
Jekyll is a static site generator, typically used for personal websites and blogs.
The link above contains documentation on getting started using the default theme.
You can also choose from one of these Jekyll themes or refer to these Jekyll installation instructions.
Jekyll lets you write your site in Markdown which is output into HTML and CSS.
The HTML and CSS files are generated in _site via the command jekyll build.
Once your website’s content has been built into _site, a web server can serve
the files in _site to web browsers.
First though, you probably want to run your site locally:
jekyll serve
If you navigate in a browser to localhost:4000, you should be able to view
your site.
But how to let anyone with an internet connection view your site?
You have to deploy your site to a (production) server.
There are different ways to do this. We will discuss some of them in the remainder of this post.
Old school
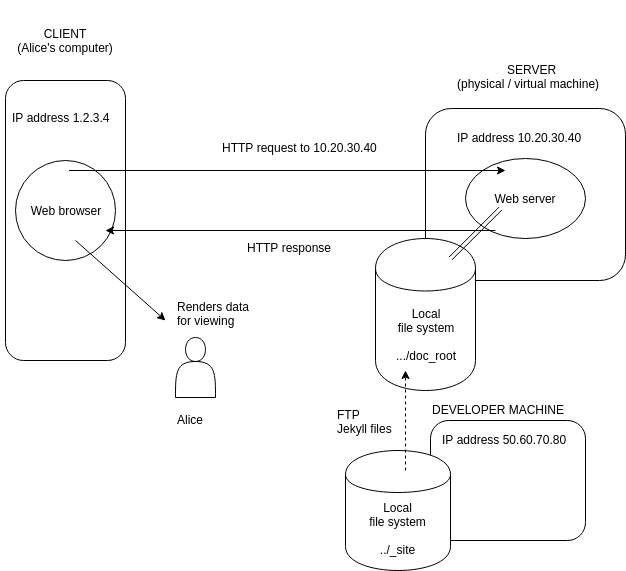
You FTP the contents of _site into the document root of your server, e.g.
/usr/share/nginx/html for Nginx or /var/www/html
for Apache.
Conceptually, this is probably the simplest approach:
However, disadvantages are:
- lack of portability, e.g. changing server
- no version control (for the project itself and deployment configuration)
- single point of failure
- no automatic restart
- large duplication cost running staging and production environments
And it is difficult to:
- automate the deployment process
- collaborate with others on the project
- achieve load balancing, scaling
This list is far from exhaustive. Further, such problems will typically get worse developing more complex applications.
Containerisation
Containerisation allows you to isolate all the software and associated configuration required to run your application from the hardware hosting it and any other software running on the host.
It can be used to modularise parts of the deployment process.
It allows you to switch hardware or cloud technology more easily, e.g. from Amazon EC2 to Google Compute Engine.
The most popular container technology at the time of writing is Docker (see here for a simple use case of Docker).
How do we containerise our Jekyll website?
We bundle our web server and the files it serves together into a container.
This translates into the following Dockerfile
FROM nginx:alpine

COPY ./_site /usr/share/nginx/html
which is turned into a Docker image via docker build.
The image can then be run on the host via docker run, exposing our Jekyll site to the
internet.
Continuous Integration
Suppose you have several developers working on the same project which has a main
branch (typically called master or develop).
After a developer has finished working on a bug fix or feature, they request for their copy of the code to be integrated into the main branch. The code is reviewed and modified if necessary, before becoming production-ready.
However, by this time the main branch has changed as other developers in the team have integrated their work.
As a result, the developer might have to resolve merge conflicts, refactor, or, in extreme cases, take a different approach altogether and start over.
Collectively, these problems are known as “integration hell”.
One outcome of “integration hell” is the developer spending more time changing their code at the point of integration than completing the original task.
In an ideal world, a developer “continously” integrates their code into the main branch as they make their changes.
In reality, continuous integration means taking measures to ensure the time taken for a developer to implement production-ready changes is short.
Examples:
a) Giving developers more, but smaller, tasks, e.g. breaking up a large task into smaller ones
b) Automating code quality checks
A common technique for b) is to have a temporary build server spin up, e.g. CircleCI each time code is committed to a Git hosting provider, e.g. Github.
As well as checking the code builds without errors, the build server runs automated tests and linters (code style checks, suspicious constructs, etc.), reporting back the results.
We are going to assume you have a Github account containing a repository for your Jekyll website and have completed the Github-CircleCI integration.
Create a .circleci directory in the project root.
In .circleci, create config.yml.
config.yml is parsed by CircleCI each time a commit is pushed to Github and contains the
configuration and instructions for our temporary build server.
The syntax is YAML which stands for “Yet Another Markup Language” or “YAML Ain’t Markup Language” depending on who you believe.
YAML is a superset of JSON. Here is a guide to YAML basics.
In CircleCI, workflows consist of jobs which consist of steps.
To keep things simple, we aren’t going to worry about automated tests or linting, only that Jekyll can build our website.
In CircleCI terms, this means we will have one workflow consisting of one job. The job
will output our site’s HTML and CSS files into _site.
Our config.yml looks something like
version: 2  # CircleCI version
jobs:
  build:  # define our job `build`
    docker:
      - image: jekyll/jekyll:3.5.0
    working_directory: /srv/jekyll
    steps:
      - checkout  # checkout latest code in Github
      - run:
        command: ./build-jekyll.sh
workflows:
  version: 2
  build:  # workflow is called `build`
    jobs:
      - build  # workflow `build` consists of a single job, also called `build`
and in our project root, build-jekyll.sh
#!/usr/bin/env bash

set -xe

mkdir site
jekyll build
Now, the next time you push changes to your Jekyll repository in Github, this will trigger a build in CircleCI.
In CircleCI, you should be able to see this build and its progress as it executes the
instructions in config.yml.
Continuous Deployment
We saw above how CircleCI runs automated checks to ensure software quality each time changes are pushed up to a repository. This was part of continuous integration.
If the checks fail, the developer responsible can make the necessary changes in order for the checks to pass.
If the checks pass, and the changes pass code review, they can be integrated into the main branch.
The next step is for these changes to be reflected in a new release of the software, i.e. for the changes to be propagated to a version of the software running in a production environment.
However, often the new release of the software will be first mocked in an environment identical (or very similar to) the production environment. This environment is typically called staging.
If this step is done manually, there will be a non-negligible delay between the time of integration into the main branch and the new release.
If it is done automatically, i.e. integration into the main branch triggers a sequence of actions leading to a new release of the software in staging, this is continuous delivery.
If it is done automatically and the new release is in production, this is continuous deployment.
In Part 2, we will see how we can integrate CircleCI with Google Cloud Platform to achieve continuous deployment for our Jekyll site.
In doing so, we will use containerisation in conjunction with Kubernetes, a container orchestration / management system.